Wednesday, June 22, 2011

How to build a desktop computer (part 1)


Assembling a computer is very easy provided need to be bit careful while giving power connections and fixing peripherals to the motherboard. I will explain in detail how to assemble a desktop computer.

REQUIREMENTS :

(1) MOTHERBOARD
You can choose INTEL, GIGABYTE, ASUS, MSI and many more depending on motherboard features and obviously your money limit). I personally recommend INTEL
motherboard.

(2) PROCESSOR
Processors depends on the speed (Example: 2.8Ghz (Giga Hertz), 3 Ghz, etc). You have INTEL and AMD processors available in the market. I recommend if you are looking only for gaming purpose, you can choose AMD. Please note that when purchasing processor, whether INTEL or AMD make sure with the vendor that the processor supports the motherboard which you are planning to purchase.

(3) RAM (RANDOM ACCESS MEMORY)
RAM is available in different types like SDRAM, DDR1, DDR2, DDR3. Some motherboards support only DDR1 and some DDR2 or DDR3. So make sure that the RAM you purchase supports the motherboard.

(4) CDROM /DVD-RW /COMBO DRIVE
Many brands are available such as LG, SAMSUNG, LITEON etc.

(5) HDD (HARD DISK DRIVE)
Many brands are available such as SEAGATE, SAMSUNG, WESTERN DIGITAL etc. There are two types of HDD available. They are IDE HDD and SATA HDD which can be fixed inside cabinet.

(6) ATX CABINET
Cabinet is a metal or metal coated box where you fix motherboard and all other peripherals related to computer.

(7) SMPS (SWITCH MODE POWER SUPPLY)
SMPS is the power supply where you connect the computer from main power supply using power chord.

(8) MONITOR
This is an output device available as two types. One is CRT and the other is LCD. CRT monitor is heavy when compared to LCD monitor.

Note: Always remember to check with vendor for compatibility and support of any hardware peripherals with motherboard you purchase.

Tuesday, June 21, 2011

Cannot open BIOS for changing the settings

If you want to install operating system through bootable operating system CD/DVD and you are not able to make any changes in BIOS like changing the first boot sequence to CD/DVD drive, then you have to first clear or reset the BIOS settings to factory default and make any changes you desire.

Procedure:
Switch of the computer. Open the CPU cabinet and look for the battery placed on the motherboard. 
 Remove the battery and switch on the computer. Now you should be able to see " CMOS ERROR " press F2 or F10 or DEL to enter BIOS. The error message varies depending on the manufacturers of the motherboard and BIOS. Switch off the computer now and put the battery back to motherboard and switch on the computer and press F2 or F10 or DEL to enter BIOS depending on your BIOS manufacturers. You should now be able to make any changes to BIOS. Remember, any changes made to the BIOS will not be saved if there is no battery placed on the motherboard.

Monday, June 20, 2011

How to repair corrupted system files in Windows XP


There are numerous ways to fix corrupted system files in Windows XP like:

Starting the computer by selecting CD/DVD drive option as first boot sequence in BIOS. Insert operating system CD/DVD into CD/DVD drive and select “ R” option to repair corrupted files during the Windows XP operating system installation.

If the operating system is already installed, then boot the operating system and insert operating system CD/DVD into CD/DVD drive. Click on START Windows XP installation and select UPGRADE instead of FULL INSTALLATION option and click NEXT to continue operating system installation. If FULL INSTALLATION option is selected then all existing user files and folders including operating system files and folders will be deleted. The option FULL INSTALLATION is considered as new installation of operating system.

The easiest way to repair corrupted files is to boot the already installed Windows XP operating system. First insert operating system CD/DVD into CD/DVD drive then hold the WINDOWS key and press R to open RUN window or go to START and click on RUN to open RUN window. Type " SFC /SCANNOW " without double quotes and press ENTER key to fix all corrupted files on Windows XP. SFC (SYSTEM FILE CHECKER) is a DOS command utility to check and repair system related files. There are many parameters that can be used with SFC command. For more parameters hold WINDOWS key and press R to open RUN window. Type " cmd " without double quotes and press ENTER key to open DOS window. At the command prompt type " SFC /? " without double quotes and press ENTER key.

Note: Always use original operating system CD/DVD for good and better performance. With original operating system installed, you will have many featured enabled like WINDOWS UPDATES thus making your computer fully secure from software bugs.

Saturday, June 18, 2011

How to access remote computer's drives and folders from your computer through RUN window

For example if you have three computers connected to network (A, B, C) assuming A, B, C are the names of the computers and you want to access " D "drive of computer " B " from computer " A ". The procedure is

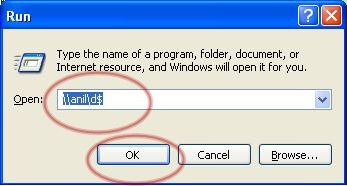
Go to START and click on RUN or hold the WINDOWS key and press R to open RUN window. Type
" \\B (computer name of computer B) or IP address of computer B\D$ " and press ENTER key. If assigned any administrator password a window will popup asking username and password of computer " B ". Enter the username and password and press ENTER key to open Drive D of computer B.
It should look like " \\B\D$ "
If you do not know the IP address of the remote computer, hold the WINDOWS key and press R to open RUN window. Type " cmd " and press ENTER key to open DOS window.  In the DOS command prompt type " ping <computer name> ". In the above example type " ping B " and press ENTER key to get the IP address of the computer " B ".
 
In the above image I am pinging the remote computer ANIL to get the IP address.

There is another way to access remote computer through WINDOWS EXPLORER. Hold the WINDOWS key and press E or hold the WINDOWS key and press R to open RUN window. Type
" explorer " and press ENTER key to open WINDOWS EXPLORER. In the ADDRESS BAR type
" \\B\D$ "

Thursday, June 16, 2011

How to install SATA hard disk drive when your motherboard does not have SATA port

SATA hard disk is cheaper and has high data transfer rate compared to IDE hard disk drives. All recent motherboard has integrated SATA port whereas some older motherboards do not have SATA port.

Usually there are two types of SATA hard disk drives depending on manufacturers.
Some hard disk manufacturers do not provide power slot in the hard disk where you need SATA power cable for power supply for hard disk drive as shown in the image.
 In the first image above label 1 is for connecting SATA data cable and label 2 is for connecting SATA power cable.
In the above image power slot is readily available in the hard disk drive along with SATA power slot and a port for connecting SATA data cable, so there is no need of extra SATA power cable. You can directly plug any one power connector  which comes from SMPS to hard disk power slot.
 If you want to fix SATA hard disk drive to the motherboard which does not have SATA port you have to purchase IDE  to SATA/SATA to IDE dual convert adapter or USB to SATA/IDE cable.

IDE  to SATA/SATA to IDE dual convert adapter as shown in the image is a card which has to be fixed to the IDE slot of the motherboard. IDE slot is where you fix the IDE hard disk drive with 40 pin IDE data cable. This card does not need any drivers to be installed.
The USB to SATA/IDE cable has one SATA and one IDE port which has to be connected to USB port of the computer. When SATA or IDE hard disk connected with this cable it acts as a removable disk.

Google Analytics