Showing posts with label Computer Repair. Show all posts

Thursday, May 03, 2012

Installing device driver for computer hardware devices

In the previous post, I had discussed about viewing installed or not installed devices. This post tells you how to install device driver for computer hardware devices.

PROCEDURE:

If you have installed WINDOWS operating system freshly, some on-board motherboard hardware devices such as display, audio, enternet, etc or if you have installed any additional hardware devices other than on-board hardware devices such as display, audio, enternet, etc need to be detected using drivers manually. All motherboard manufacturers provide drivers CD/DVD along with the  motherboard when purchased.

If the drivers CD provided is AUTOPLAY (when CD/DVD is inserted into the CD/DVD drive the drivers application software runs automatically showing the list of motherboard drivers to be installed) select the devices from the list whose drivers needs to be installed and click on install or follow the instructions provided in the drivers application software till you finish the installation. Once finished installation restart the computer if needed to make the drivers detect the hardware devices.

If the CD/DVD provided is not AUTOPLAY, then follow the procedure as shown below.

Go to "START" and click on "SETTINGS" and click on "CONTROL PANEL" to open CONTROL PANEL window. Inside CONTROL PANEL window double click on "SYSTEM" to open "SYSTEM PROPERTIES" window. In the "SYSTEM PROPERTIES" window click on "HARDWARE" tab. Now you should be able to see a "DEVICE MANAGER" or hold the "WINDOWS KEY" and press "R" to open RUN window or go to "START" and click on "RUN" to open RUN window. Now type "devmgmt.msc" in the RUN window and click OK button or press "ENTER" key to open DEVICE MANAGER window.

In the DEVICE MANGER list look for "OTHER DEVICES". The drivers for the hardware devices list shown under "OTHER DEVICES" are not installed.
 
Now insert the drivers CD/DVD provided by the motherboard manufacturer into the CD/DVD drive. Now double click on the first device under the "OTHER DEVICES" list. A new window opens up showing the properties of that particular device. Now click on "RE-INSTALL DRIVER" button to open "HARDWARE UPDATE WIZARD" window.
Now select "No. not this time" and click "NEXT" to go to next step. 

In the next step select "INSTALL FROM A LIST OR SPECIFIC LOCATION (ADVANCED)" and click on "NEXT" to go to next step. 

Here select only "SEARCH REMOVABLE MEDIA (FLOPPY, CD_ROM...)" and click "NEXT" to begin installation of driver from the CD/DVD.

It automatically detects the drivers for the particular hardware device. Finally click "FINISH" to complete the device driver installation. Follow the same procedure for installing device driver for all the devices that are not installed and that are shown in the list under "OTHER DEVICES" list.

NOTE:

WINDOWS XP operating system service pack2 or WINDOWS XP operating system service pack3 comes with most motherboard hardware components drivers integrated. It all depends on the type and the manufacturer of the motherboard. As a result, some motherboards drivers need not be installed manually as the device drivers would have been installed when installing operating system. If some motherboard hardware drivers not installed during installation of WINDOWS operating system, then you need to install drivers manually for those hardware components.

Tuesday, May 01, 2012

How to know devices that are not properly installed in WINDOWS

In a computer any devices (example: DVD Writer, Display, Network card or Ethernet card or any external devices attached, etc) to work properly you need to install driver for that particular device. If you are facing problem with any devices not working properly or not getting detected properly, then you might have not installed the device driver properly or if already installed then the device driver might have been corrupted or the device hardware itself should be having a problem. All the computer hardware components or devices installed successfully or unsuccessfully can be viewed in DEVICE MANAGER.

To open DEVICE MANAGER, go to "START" and click on "SETTINGS" and click on "CONTROL PANEL" to open CONTROL PANEL window. Inside CONTROL PANEL window double click on "SYSTEM" to open "SYSTEM PROPERTIES" window. In the "SYSTEM PROPERTIES" window click on "HARDWARE" tab. Now you should be able to see a "DEVICE MANAGER" button.
Click on "DEVICE MANAGER" to open "DEVICE MANAGER" window to see the list of all installed devices in your computer.
The easiest way to open DEVICE MANAGER using keyboard is hold the "WINDOWS KEY" and press "R" to open RUN window or go to "START" and click on "RUN" to open RUN window. Now type "devmgmt.msc" in the RUN window and click OK button or press "ENTER" key to open DEVICE MANAGER window.

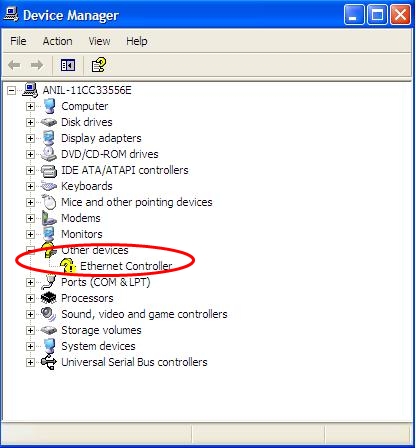
In the device list if any device which has a yellow question mark with exclamatory symbol on the left side of the device name as shown below, means that particular device is not installed. In order to make that particular device work properly, you should install driver for that device. In the below image you can see that there is a yellow question mark with exclamatory symbol next to "EHTERNET CONTROLLER". This means the network or ethernet driver is not installed. In order to make the ETHERNET CONTROL work, you need to install the ethernet or network driver.
Sometimes some devices will not work even if the driver is installed properly. For example, consider sound driver is installed properly and you are not be able to hear the sound. Then first check whether the volume control in the STATUS bar is MUTE. If it is not mute then re-installing the device driver for sound card. If you still cannot hear the sound, then chances are more that your sound card hardware device is not functioning properly.

Monday, April 30, 2012

Transfer data or contents from one IDE hard disk to another IDE hard disk (Part 2)


PROCEDURE FOR CONNECTING TWO HARD DISK DRIVES TO TWO INDIVIDUAL IDE DATA CABLES

Usually the old motherboard has two IDE slots. You can connect one IDE slot to hard disk drive and the other IDE slot to IDE CD-ROM or Combo Drive OR DVD Drive

Now connect one end of the first IDE data cable to hard disk drive ( MASTER or first hard disk drive ) and the other end to first IDE port of the motherboard. Similarly connect second IDE data cable to the hard disk drive ( SLAVE or second hard disk drive )and the other end to the second free IDE slot on the motherboard as shown below.


Note :

(1) Jumper pin settings vary depending on the brand of the hard disk manufacturer.
(2) Most of the recent motherboards will have only one or will not have IDE slot. Instead will have only SATA port.

Sunday, April 29, 2012

Transfer data or contents from one IDE hard disk to another IDE hard disk (Part 1)

If you want to transfer large data or content from one hard disk to another hard disk, it just simply cannot be done by connecting two hard disk and switching on the system. Here is the procedure to copy data from hard disk to hard disk without any hassle.

Always remember whenever you want to copy from hard disk to hard disk, one hard disk must be MASTER and another hard disk must be SLAVE provided if you are connecting both hard disk to a single IDE data cable. If you are connecting two hard disk using two IDE data cables, then no need to make either of the hard disk as MASTER or SLAVE.

PROCEDURE IF YOU ARE CONNECTING TWO HARD DISK DRIVES USING SINGLE IDE DATA CABLE

In SEAGATE brand hard disk there is a jumper pin setting space between the IDE data cable slot where you fix the data cable to hard disk and power slot where you fix the power cable which comes from SMPS (power supply) as shown in the image below

Click here to see the purpose of using a jumper.
By default when you purchase a new hard disk the jumper pin is set to MASTER. To make the hard disk SLAVE remove the jumper pin (In Seagate Hard Disk Drive). Removing the jumper pin makes the hard disk to act as SLAVE.

All the hard disk manufacturers have a jumper pin settings diagram pasted on the hard disk as shown below.
After making sure that one hard disk is master and the other is slave, connect both hard disks as shown below.
Now you should be able to see the drives of both hard disk drives when you switch on the system.

The IDE data cable comes with two and three slots. You need to use three slots IDE cable if you are connecting two hard disk using only one IDE data cable. Out of three slots first slot should be connected to MOTHERBOARD also called as MAIN BOARD and the second free slot should be connected to MASTER hard disk drive and the third free slot has to be connect to SLAVE hard disk drive.

There are chances when two hard disk are connected to a single IDE data cable, sometimes the SLAVE or MASTER hard disk will not be detected. In that case you have to connect both hard disk with individual IDE data cables ie, one ide data cable for MASTER hard disk drive and another IDE data cable for SLAVE hard disk drive.

Note:
(1) Jumper pin settings vary depending on the brand of the hard disk manufacturer.
(2) This method is not required if both hard disk drives are of SATA type. For SATA type hard disk drive, simply connect both hard disk drives to the mother board using individual SATA data cables. After connecting properly you should be able to see both hard disk drives when your windows boots up.

Tuesday, July 12, 2011

How to remove Windows Security Alert from status bar tray

Follow the procedure to turn off automatic windows updates and to remove Windows security alert from status bar tray.
Hold WINDOWS key and press R or go to START and click on RUN to open RUN window. Type
" MSCONFIG " without doubles quotes and press ENTER key or click OK button to open SYSTEM CONFIGURATION UTILITY
 Click on SERVICES tab and in the list look for the name SECURITY CENTER and deselect.
Now click OK. You will be asked to RESTART the computer for changes to be affected.
To remove Windows automatic updates:

Hold WINDOWS key and press R or go to START and click on RUN to open RUN window. Type
" MSCONFIG " without double quotes and press ENTER key or click OK button to open SYSTEM CONFIGURATION UTILITY.
 
Click on SERVICES tab and in the list look for the name AUTOMATIC UPDATES and deselect.
Now click OK. You will be asked to RESTART the computer for changes to be affected.

Thursday, July 07, 2011

How to create backup and restore registry

To SAVE or EXPORT or BACKUP registry.

Go to START and click on RUN or hold WINDOWS key and press R to open RUN window. Type 
" REGEDIT " without double quotes and press ENTER key to open REGISTRY EDITOR.
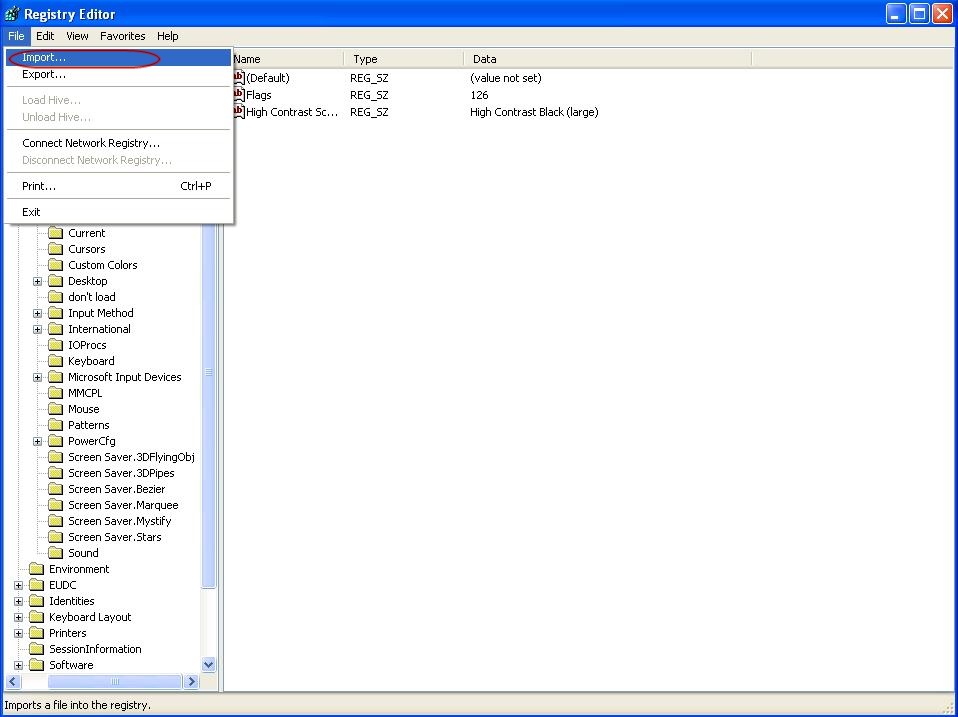
Go to FILE menu and click on EXPORT.
Give a name and path and click on OPEN to save the registry file.
To RESTORE or IMPORT the existing backup registry file.

Considering you have already taken backup of the registry to a file, go to FILE and click on IMPORT.
Now go the location of the saved registry file. Select the backup registry file and click on OPEN to restore the previous stored registry settings.

Tuesday, July 05, 2011

How to create desktop icons, files and folders without any name in Windows XP

If you want to remove the names placed under the icons on desktop do the following procedure.

Right click on the icon  and click on RENAME or select the icon and press SHIFT + F3 to open right click mouse button and select RENAME or just select the icon and press F2 to RENAME.

Now delete the existing name and type 255 holding ALT button and press ENTER key. You can see no name under the icon.

Note:
  • This works only with alphanumeric keypad numbers and not the numbers placed in the second row of the keyboard.
  • This method works even for files and folders placed on desktop.

Sunday, July 03, 2011

How to restrict shutdown of Windows XP

There are many ways to shutdown Windows XP.

  1. Press WINDOWS key and press U twice to shutdown computer
  2. Go to START and click on TURN OFF COMPUTER and again click TURN OFF
  3. Press CTRL+ALT+DEL and select SHUTDOWN and click OK
  4. Go to START and press R to open RUN window. Type " SHUTDOWN –s " without double quotes to shutdown the computer
Procedure to remove the option of shutting down the computer
You have to login as ADMINISTRATOR to make any changes in the GROUP POLICY

Hold the WINDOWS key and press R or go to START and click on RUN to open RUN window. Type 
" gpedit.msc " without double quotes and click OK or press ENTER key to open GROUP POLICY window.

In the left window go to USER CONFIGURATIONADMINISTRATIVE TEMPLATES and double click on  STARTMENU AND TASKBAR.
Now in the right window double click on REMOVE LOGOFF ON THE START MENU and select ENABLE
Now just below REMOVE LOGOFF ON THE START MENU double click on REMOVE AND PREVENT ACCESS TO THE SHUTDOWN COMMAND and select ENABLE.
 
Now in the left window go to USER CONFIGURATION ADMINISTRATIVE TEMPLATES double click on SYSTEM. In the right window PREVENT ACCESS TO THE COMMAND PROMPT and select ENABLE.
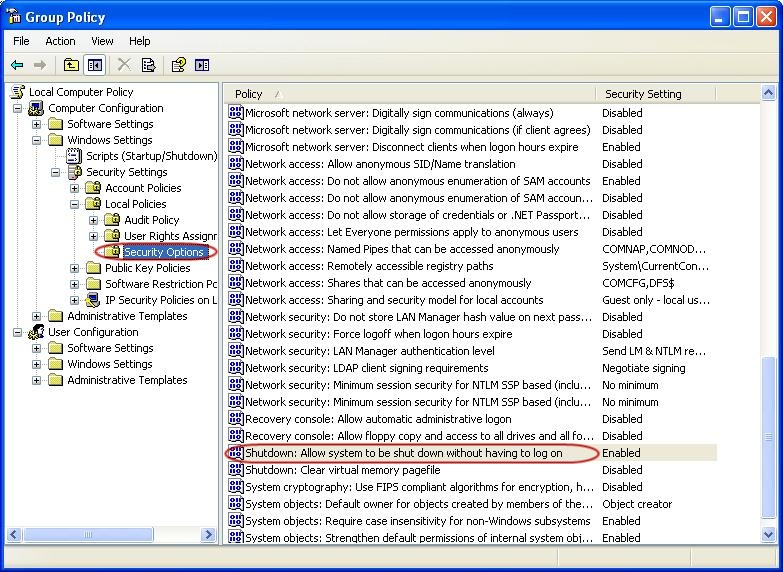
If you want to allow the person to shutdown who has already logged in. Go to COMPUTER CONFIGURATIONWINDOWS SETTINGSSECURITY SETTINGSLOCAL POLICIES and double click on SECURITY OPTIONS. In the right window double click on SHUTDOWN: ALLOW SYSTEM TO BE SHUT DOWN WITHOUT HAVING TO LOG ON and select DISABLED.

Thursday, June 30, 2011

How to build a desktop computer (part 5)

Once all the hardware peripherals are connected to cabinet, the most important and final part of assembling computer is providing proper power connection to the motherboard and other hardware peripherals.

Power connections from SMPS to motherboard and other hardware peripherals is very crucial. The 20 or 24 pin power connector and one 4 pin power connector which comes from SMPS has to be fixed to motherboard. 
Both 20 or 24 pin and 4 pin power connectors have a lock.
Not all motherboards have 24 pin power connector. Some motherboards will have only 20 pin power connectors. 
Look for the 20 or 24 pin power connector on the motherboard and connect the 20 or 24 pin power connector from SMPS to motherboard as shown in the below image.
Now connect the 4 pin power connector from SMPS  to the 4 pin connector of the motherboard as shown in the image.
Note that some older motherboard will not have the option of providing 4 pin power connector.

All CPU cabinets will have a set of cables or wires such as power, reset, hard disk LED and power LED, speaker, USB and sound which has to be connected to motherboard.
The USB and sound cables are provided only if you have a provision for connecting USB devices and sound from the front of your cabinet.

Look for the name F_PANEL or FRONT PANEL or PANEL1 on the motherboard. All motherboard manufacturers name the front panel connections differently.
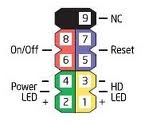
The F_PANEL is a 10 pin connector.
In the F_PANEL you find some times RST for reset, ON/OFF or PWR_BTN or PWR_SWITCH or PW for power, SPK or SPEAKER for speaker, HDD_LED or HD_LED or HLED or HD for hard disk drive LED, POWER_LED or POW_LED or PWR_LED for power LED.

Usually in 10 pin front panel power connector you will find only 9 pins as shown in the above image. The 9th pin as shown in the above image should be always free. Meaning you should not connect able wire or cable to the 9th pin. The two pins next to the block without pin is for power connection and the two pins just opposite to two power pins is for reset and two pins next to reset is for hard disk drive LED and two pins opposite to hard disk drive LED is for power LED. Not all motherboard manufacturers will have the above said front panel power connections design. Always refer motherboard manual for the power connections.

After all the power connections to the motherboard is over cross check once again with the motherboard manual for front panel connections. Then plug the power chord from SMPS to the main power supply.

Wednesday, June 29, 2011

How to build a desktop computer (part 4)


After fixing motherboard along with processor and SMPS to ATX cabinet, next step is to fix or install RAM (Random Access Memory), hard disk drive and CDROM-RW/DVD-RW/COMBO DRIVE to the cabinet.

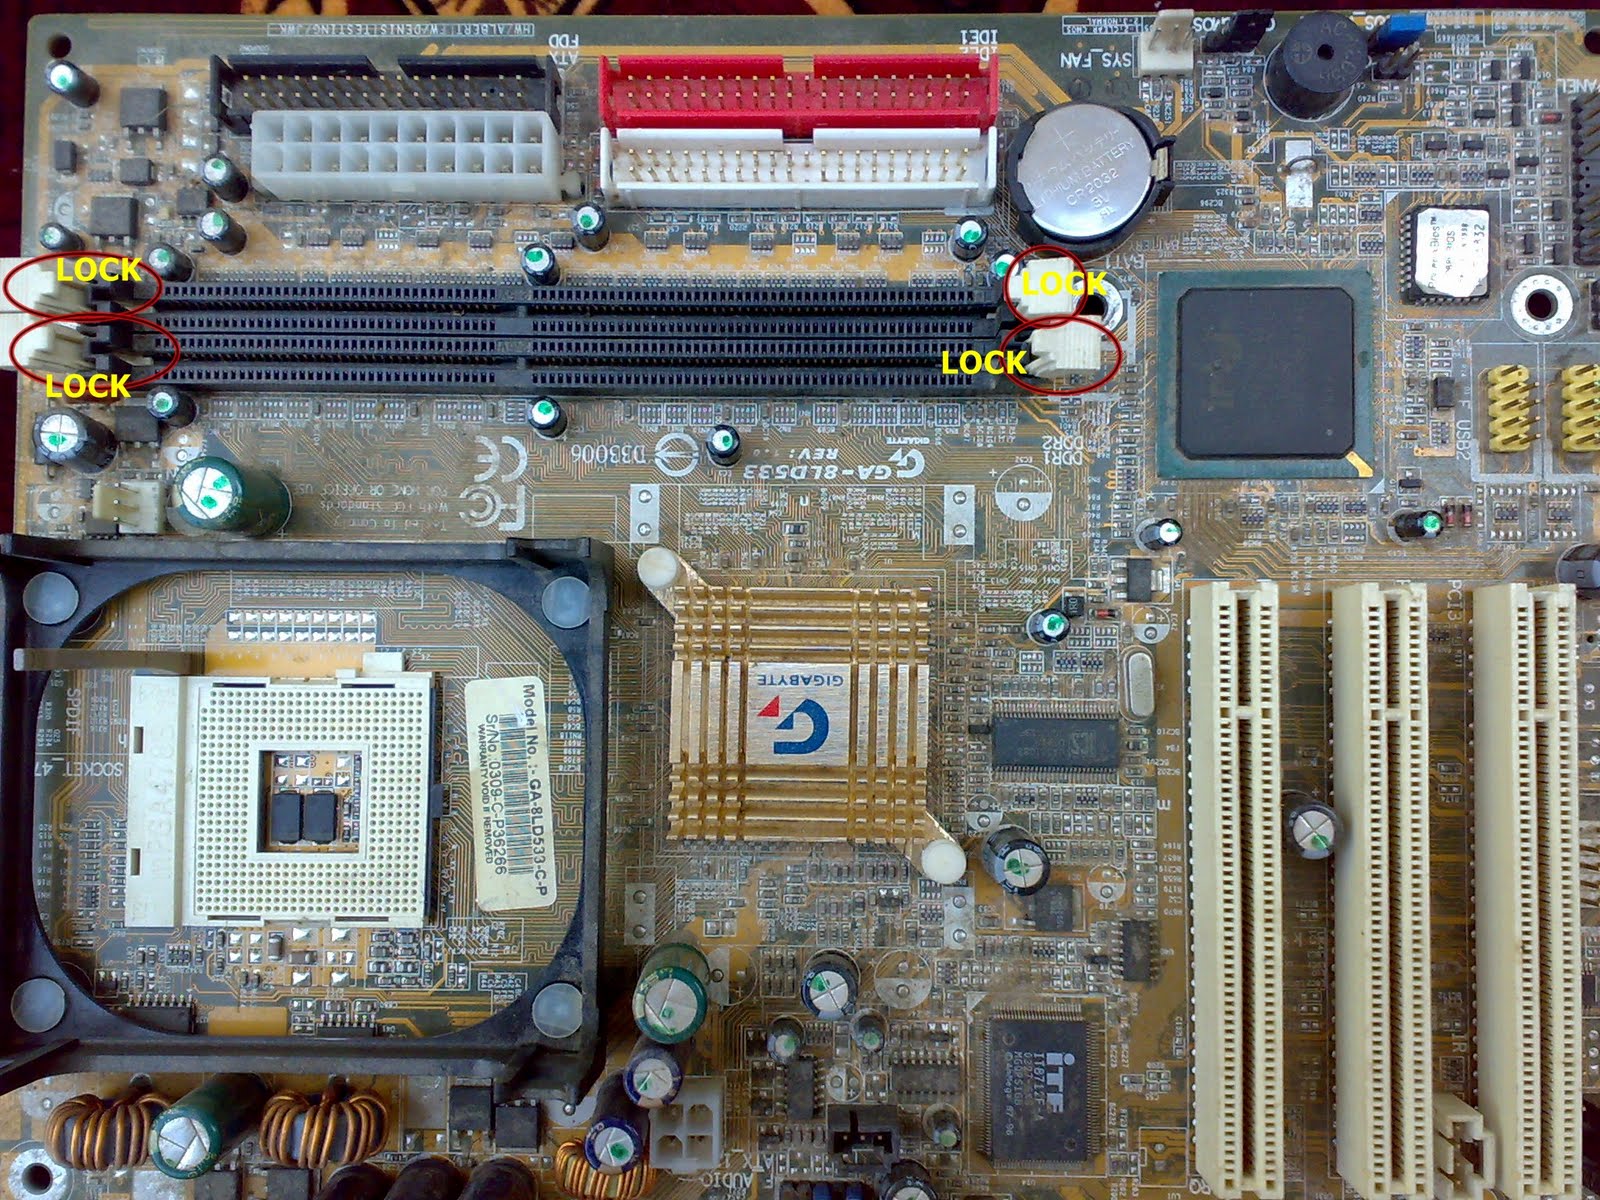
RAM (DDR1 or DDR2 or DDR3) depends on the motherboard you have purchased. Some motherboard supports DDR1 RAM and some support DDR2 or DDR3. Make sure that you check with your hardware vendor for the supported RAM to the purchased motherboard. DDR1 and DDR2 can be distinguished as shown in the below image.
Take the RAM and place it on the motherboard in the RAM slot 
as shown in the image
Make sure that when placing RAM in RAM slot the distance between either side of the notch on the motherboard has to match that of RAM.
After placing RAM in the slot, press firmly towards motherboard to get locked by the RAM lock
Below image shows the difference between the RAM which is locked and unlocked.
After RAM is fixed, take the hard disk drive and CDROM-RW/DVD-RW/COMBO DRIVE and fix them to cabinet as shown in the image.

Google Analytics