Tuesday, July 12, 2011

How to remove Windows Security Alert from status bar tray

Follow the procedure to turn off automatic windows updates and to remove Windows security alert from status bar tray.
Hold WINDOWS key and press R or go to START and click on RUN to open RUN window. Type
" MSCONFIG " without doubles quotes and press ENTER key or click OK button to open SYSTEM CONFIGURATION UTILITY
 Click on SERVICES tab and in the list look for the name SECURITY CENTER and deselect.
Now click OK. You will be asked to RESTART the computer for changes to be affected.
To remove Windows automatic updates:

Hold WINDOWS key and press R or go to START and click on RUN to open RUN window. Type
" MSCONFIG " without double quotes and press ENTER key or click OK button to open SYSTEM CONFIGURATION UTILITY.
 
Click on SERVICES tab and in the list look for the name AUTOMATIC UPDATES and deselect.
Now click OK. You will be asked to RESTART the computer for changes to be affected.

Thursday, July 07, 2011

How to create backup and restore registry

To SAVE or EXPORT or BACKUP registry.

Go to START and click on RUN or hold WINDOWS key and press R to open RUN window. Type 
" REGEDIT " without double quotes and press ENTER key to open REGISTRY EDITOR.
Go to FILE menu and click on EXPORT.
Give a name and path and click on OPEN to save the registry file.
To RESTORE or IMPORT the existing backup registry file.

Considering you have already taken backup of the registry to a file, go to FILE and click on IMPORT.
Now go the location of the saved registry file. Select the backup registry file and click on OPEN to restore the previous stored registry settings.

Tuesday, July 05, 2011

How to create desktop icons, files and folders without any name in Windows XP

If you want to remove the names placed under the icons on desktop do the following procedure.

Right click on the icon  and click on RENAME or select the icon and press SHIFT + F3 to open right click mouse button and select RENAME or just select the icon and press F2 to RENAME.

Now delete the existing name and type 255 holding ALT button and press ENTER key. You can see no name under the icon.

Note:
  • This works only with alphanumeric keypad numbers and not the numbers placed in the second row of the keyboard.
  • This method works even for files and folders placed on desktop.

Sunday, July 03, 2011

How to restrict shutdown of Windows XP

There are many ways to shutdown Windows XP.

  1. Press WINDOWS key and press U twice to shutdown computer
  2. Go to START and click on TURN OFF COMPUTER and again click TURN OFF
  3. Press CTRL+ALT+DEL and select SHUTDOWN and click OK
  4. Go to START and press R to open RUN window. Type " SHUTDOWN –s " without double quotes to shutdown the computer
Procedure to remove the option of shutting down the computer
You have to login as ADMINISTRATOR to make any changes in the GROUP POLICY

Hold the WINDOWS key and press R or go to START and click on RUN to open RUN window. Type 
" gpedit.msc " without double quotes and click OK or press ENTER key to open GROUP POLICY window.

In the left window go to USER CONFIGURATIONADMINISTRATIVE TEMPLATES and double click on  STARTMENU AND TASKBAR.
Now in the right window double click on REMOVE LOGOFF ON THE START MENU and select ENABLE
Now just below REMOVE LOGOFF ON THE START MENU double click on REMOVE AND PREVENT ACCESS TO THE SHUTDOWN COMMAND and select ENABLE.
 
Now in the left window go to USER CONFIGURATION ADMINISTRATIVE TEMPLATES double click on SYSTEM. In the right window PREVENT ACCESS TO THE COMMAND PROMPT and select ENABLE.
If you want to allow the person to shutdown who has already logged in. Go to COMPUTER CONFIGURATIONWINDOWS SETTINGSSECURITY SETTINGSLOCAL POLICIES and double click on SECURITY OPTIONS. In the right window double click on SHUTDOWN: ALLOW SYSTEM TO BE SHUT DOWN WITHOUT HAVING TO LOG ON and select DISABLED.

Thursday, June 30, 2011

How to build a desktop computer (part 5)

Once all the hardware peripherals are connected to cabinet, the most important and final part of assembling computer is providing proper power connection to the motherboard and other hardware peripherals.

Power connections from SMPS to motherboard and other hardware peripherals is very crucial. The 20 or 24 pin power connector and one 4 pin power connector which comes from SMPS has to be fixed to motherboard. 
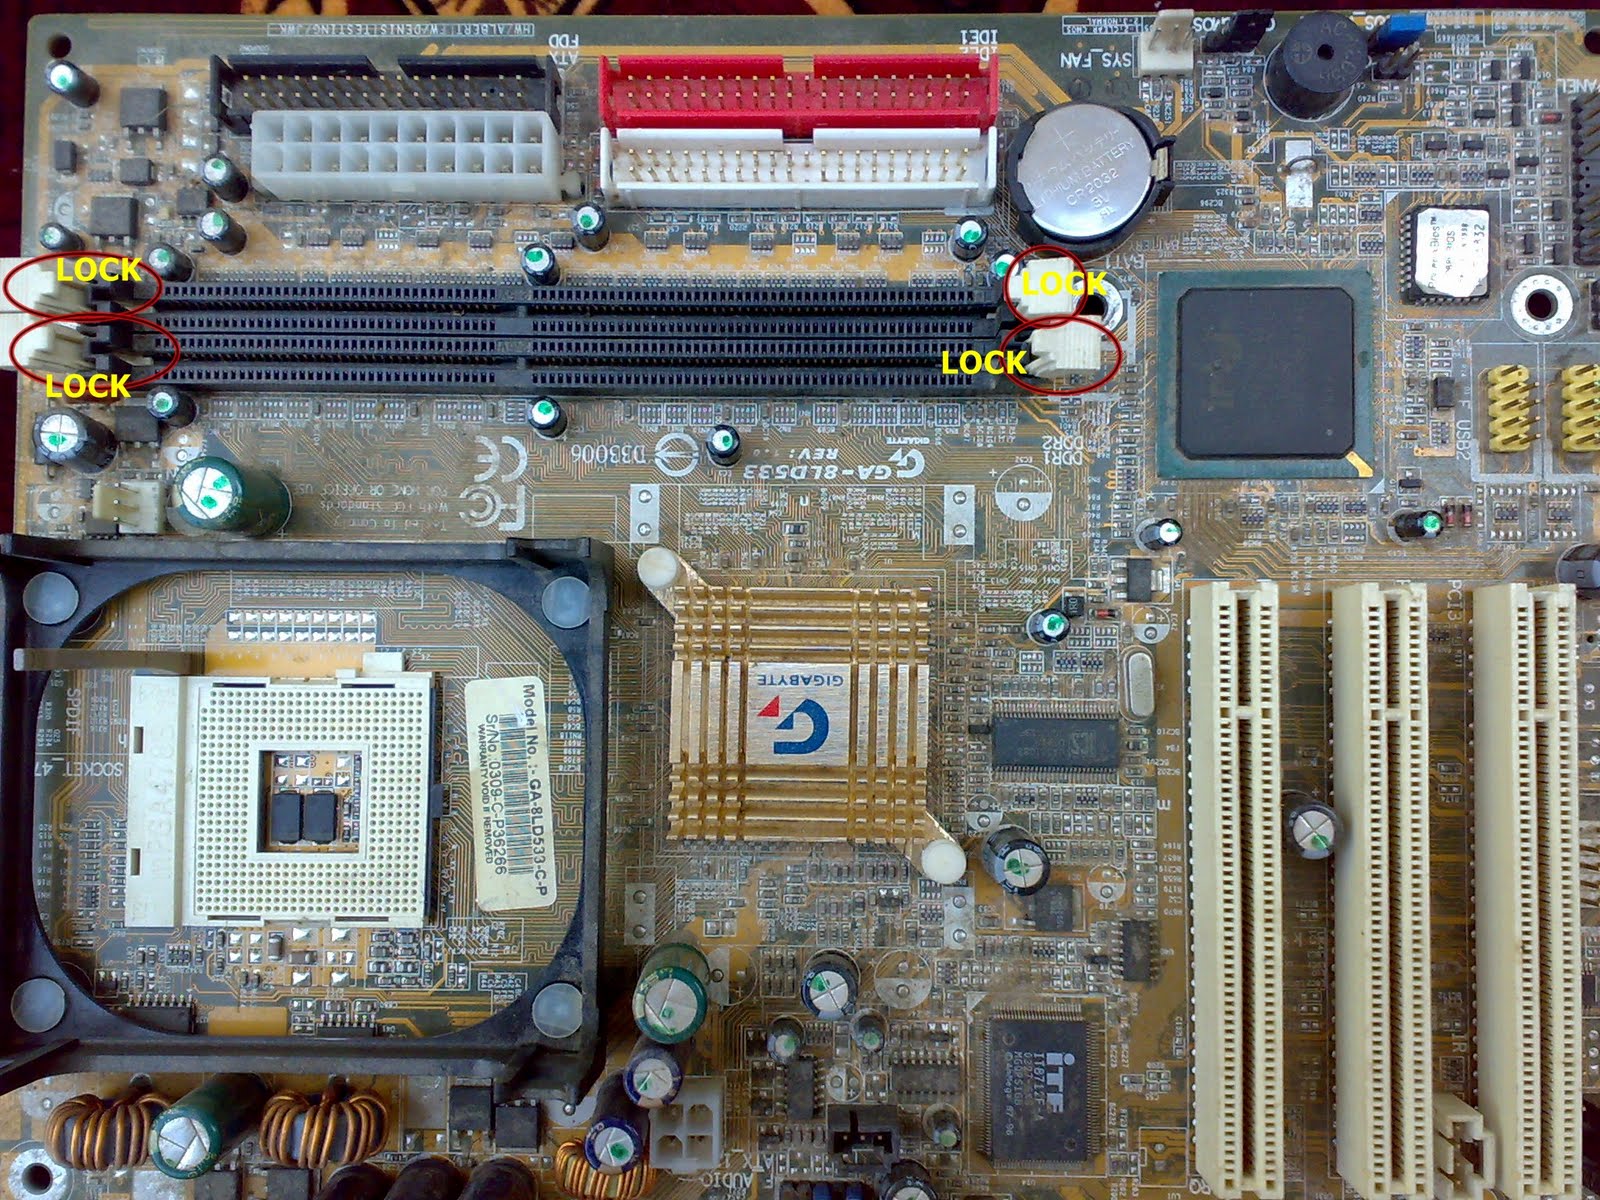
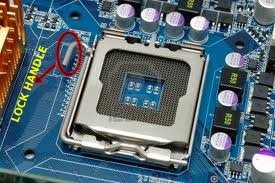
Both 20 or 24 pin and 4 pin power connectors have a lock.
Not all motherboards have 24 pin power connector. Some motherboards will have only 20 pin power connectors. 
Look for the 20 or 24 pin power connector on the motherboard and connect the 20 or 24 pin power connector from SMPS to motherboard as shown in the below image.
Now connect the 4 pin power connector from SMPS  to the 4 pin connector of the motherboard as shown in the image.
Note that some older motherboard will not have the option of providing 4 pin power connector.

All CPU cabinets will have a set of cables or wires such as power, reset, hard disk LED and power LED, speaker, USB and sound which has to be connected to motherboard.
The USB and sound cables are provided only if you have a provision for connecting USB devices and sound from the front of your cabinet.

Look for the name F_PANEL or FRONT PANEL or PANEL1 on the motherboard. All motherboard manufacturers name the front panel connections differently.
The F_PANEL is a 10 pin connector.
In the F_PANEL you find some times RST for reset, ON/OFF or PWR_BTN or PWR_SWITCH or PW for power, SPK or SPEAKER for speaker, HDD_LED or HD_LED or HLED or HD for hard disk drive LED, POWER_LED or POW_LED or PWR_LED for power LED.

Usually in 10 pin front panel power connector you will find only 9 pins as shown in the above image. The 9th pin as shown in the above image should be always free. Meaning you should not connect able wire or cable to the 9th pin. The two pins next to the block without pin is for power connection and the two pins just opposite to two power pins is for reset and two pins next to reset is for hard disk drive LED and two pins opposite to hard disk drive LED is for power LED. Not all motherboard manufacturers will have the above said front panel power connections design. Always refer motherboard manual for the power connections.

After all the power connections to the motherboard is over cross check once again with the motherboard manual for front panel connections. Then plug the power chord from SMPS to the main power supply.
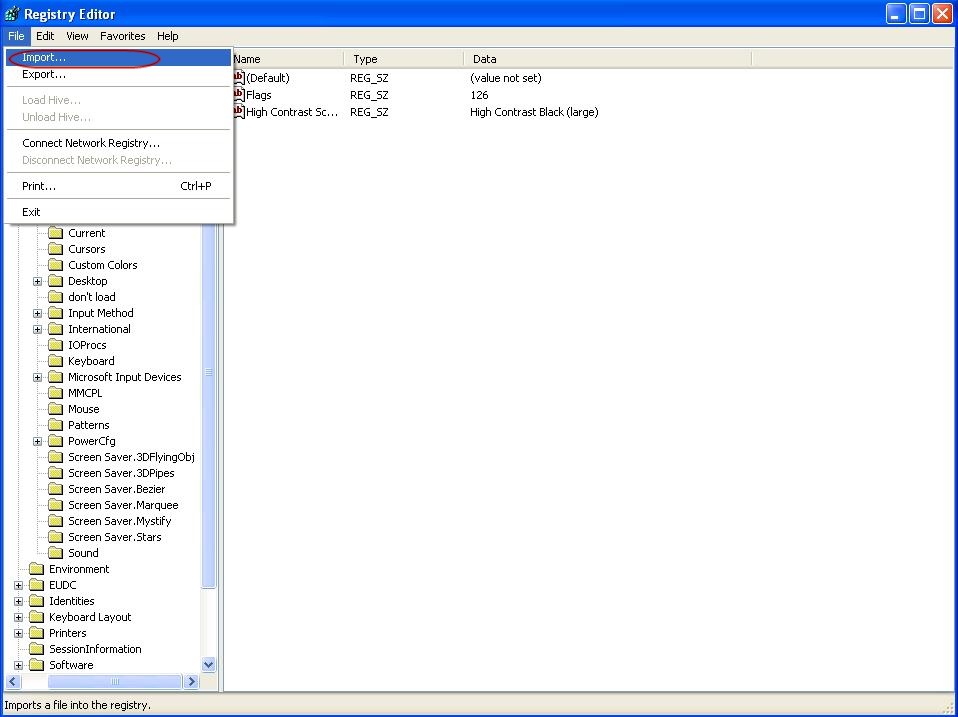
Wednesday, June 29, 2011

How to build a desktop computer (part 4)


After fixing motherboard along with processor and SMPS to ATX cabinet, next step is to fix or install RAM (Random Access Memory), hard disk drive and CDROM-RW/DVD-RW/COMBO DRIVE to the cabinet.

RAM (DDR1 or DDR2 or DDR3) depends on the motherboard you have purchased. Some motherboard supports DDR1 RAM and some support DDR2 or DDR3. Make sure that you check with your hardware vendor for the supported RAM to the purchased motherboard. DDR1 and DDR2 can be distinguished as shown in the below image.
Take the RAM and place it on the motherboard in the RAM slot 
as shown in the image
Make sure that when placing RAM in RAM slot the distance between either side of the notch on the motherboard has to match that of RAM.
After placing RAM in the slot, press firmly towards motherboard to get locked by the RAM lock
Below image shows the difference between the RAM which is locked and unlocked.
After RAM is fixed, take the hard disk drive and CDROM-RW/DVD-RW/COMBO DRIVE and fix them to cabinet as shown in the image.

Monday, June 27, 2011

How to build a desktop computer (part 3)


Take the CPU ATX cabinet and place it horizontally on the soft floor as shown in the image.
Take the SMPS (Power Supply) and place it in the cabinet as shown in the image. 
 The SMPS has to be fixed with screws provided along with ATX cabinet at the back side of the cabinet.
After fixing the SMPS, take the motherboard and place it in cabinet such a way that all ports (keyboard, mouse, USB, Printer, sound, etc) are placed at the small rectangle opening  at the back side of the cabinet. That is the motherboard has to be placed just below the SMPS.
Now the motherboard has to be fixed to the cabinet using screws as shown below.
There are small holes provided in the motherboard for fixing the motherboard to the cabinet with the help of screws. After fixing the motherboard screws make sure your motherboard is not shaking.

Note: Do not screw the motherboard to the cabinet too hard or too tight. Because there are chances that backside of the motherboard getting contact with the metal portion of the cabinet making your computer getting restarted very frequently.

Thursday, June 23, 2011

How to build a desktop computer (part 2)


Fixing processor in processor socket on the motherboard
Take the motherboard and place on any soft surface such as cardboard. All new motherboards have a plastic cover placed on processor socket.
Release the lock handle to open the lid of processor socket.
Now remove the plastic cover fixed to lid. After removing the plastic cover the processor socket has to look like this.
Now we have to place the processor in processor socket
 
Most of the recent processors come without pins. Handling the processor is very delicate. Do not hold or put your fingers in the middle of the processor. Hold the processor as shown in the image
Always remember the portion which has the name and the speed of the processor (For example: Intel Dual Core 2.8 Ghz) must be on top. Look at the sides of the processor where you can see small cuttings on both the sides.
You have to look for the same small notches on the motherboard and place the processor properly.
Now close the lid and press the lock handle down and fix it to lock the processor to the motherboard. Make sure that your processor is placed properly in the motherboard processor socket before locking the lid.

Processor fan will have four locking clips which have to be fixed to the motherboard.
On the motherboard you can see four small holes present around the processor socket. Place the processor fan on the top of the processor and push the four locking clips one by one to the holes present in the motherboard to firmly lock the processor fan. If the locking clip is not firmly fixed then remove the locking clip by rotating anti clock wise. You can see a directional image on the locking clip to lock and unlock.
Processor fan comes along with four pin power supply wire.
After fixing the processor fan, you have to plug the processor fan power supply wire to the motherboard for proper running of the fan. Look in the motherboard for the name " CPU_FAN " or  " CPU FAN " near to the surrounding area of the processor socket.
You have to plug the processor fan four pin power supply wire to the port called  " CPU_FAN " or " CPU FAN " on the motherboard.

Google Analytics