Wednesday, June 29, 2011

How to build a desktop computer (part 4)


After fixing motherboard along with processor and SMPS to ATX cabinet, next step is to fix or install RAM (Random Access Memory), hard disk drive and CDROM-RW/DVD-RW/COMBO DRIVE to the cabinet.

RAM (DDR1 or DDR2 or DDR3) depends on the motherboard you have purchased. Some motherboard supports DDR1 RAM and some support DDR2 or DDR3. Make sure that you check with your hardware vendor for the supported RAM to the purchased motherboard. DDR1 and DDR2 can be distinguished as shown in the below image.
Take the RAM and place it on the motherboard in the RAM slot 
as shown in the image
Make sure that when placing RAM in RAM slot the distance between either side of the notch on the motherboard has to match that of RAM.
After placing RAM in the slot, press firmly towards motherboard to get locked by the RAM lock
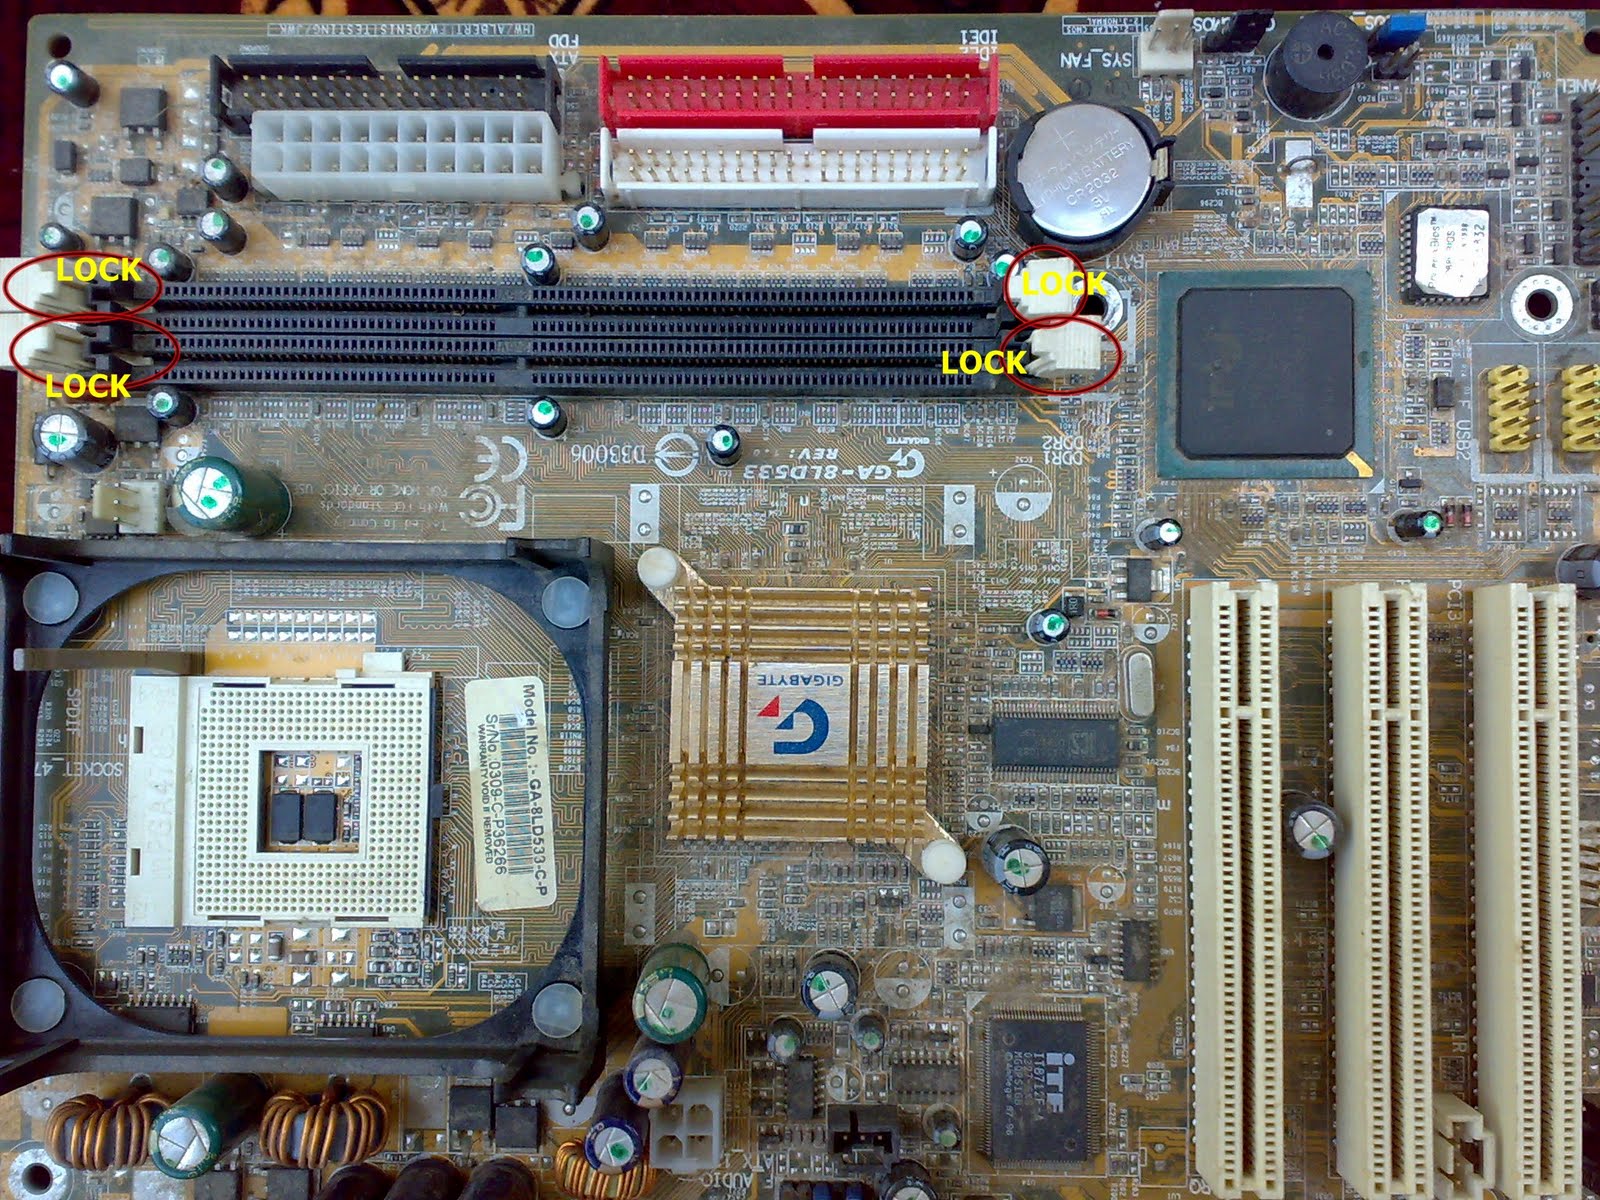
Below image shows the difference between the RAM which is locked and unlocked.
After RAM is fixed, take the hard disk drive and CDROM-RW/DVD-RW/COMBO DRIVE and fix them to cabinet as shown in the image.

Monday, June 27, 2011

How to build a desktop computer (part 3)


Take the CPU ATX cabinet and place it horizontally on the soft floor as shown in the image.
Take the SMPS (Power Supply) and place it in the cabinet as shown in the image. 
 The SMPS has to be fixed with screws provided along with ATX cabinet at the back side of the cabinet.
After fixing the SMPS, take the motherboard and place it in cabinet such a way that all ports (keyboard, mouse, USB, Printer, sound, etc) are placed at the small rectangle opening  at the back side of the cabinet. That is the motherboard has to be placed just below the SMPS.
Now the motherboard has to be fixed to the cabinet using screws as shown below.
There are small holes provided in the motherboard for fixing the motherboard to the cabinet with the help of screws. After fixing the motherboard screws make sure your motherboard is not shaking.

Note: Do not screw the motherboard to the cabinet too hard or too tight. Because there are chances that backside of the motherboard getting contact with the metal portion of the cabinet making your computer getting restarted very frequently.

Thursday, June 23, 2011

How to build a desktop computer (part 2)


Fixing processor in processor socket on the motherboard
Take the motherboard and place on any soft surface such as cardboard. All new motherboards have a plastic cover placed on processor socket.
Release the lock handle to open the lid of processor socket.
Now remove the plastic cover fixed to lid. After removing the plastic cover the processor socket has to look like this.
Now we have to place the processor in processor socket
 
Most of the recent processors come without pins. Handling the processor is very delicate. Do not hold or put your fingers in the middle of the processor. Hold the processor as shown in the image
Always remember the portion which has the name and the speed of the processor (For example: Intel Dual Core 2.8 Ghz) must be on top. Look at the sides of the processor where you can see small cuttings on both the sides.
You have to look for the same small notches on the motherboard and place the processor properly.
Now close the lid and press the lock handle down and fix it to lock the processor to the motherboard. Make sure that your processor is placed properly in the motherboard processor socket before locking the lid.

Processor fan will have four locking clips which have to be fixed to the motherboard.
On the motherboard you can see four small holes present around the processor socket. Place the processor fan on the top of the processor and push the four locking clips one by one to the holes present in the motherboard to firmly lock the processor fan. If the locking clip is not firmly fixed then remove the locking clip by rotating anti clock wise. You can see a directional image on the locking clip to lock and unlock.
Processor fan comes along with four pin power supply wire.
After fixing the processor fan, you have to plug the processor fan power supply wire to the motherboard for proper running of the fan. Look in the motherboard for the name " CPU_FAN " or  " CPU FAN " near to the surrounding area of the processor socket.
You have to plug the processor fan four pin power supply wire to the port called  " CPU_FAN " or " CPU FAN " on the motherboard.

Wednesday, June 22, 2011

How to build a desktop computer (part 1)


Assembling a computer is very easy provided need to be bit careful while giving power connections and fixing peripherals to the motherboard. I will explain in detail how to assemble a desktop computer.

REQUIREMENTS :

(1) MOTHERBOARD
You can choose INTEL, GIGABYTE, ASUS, MSI and many more depending on motherboard features and obviously your money limit). I personally recommend INTEL
motherboard.

(2) PROCESSOR
Processors depends on the speed (Example: 2.8Ghz (Giga Hertz), 3 Ghz, etc). You have INTEL and AMD processors available in the market. I recommend if you are looking only for gaming purpose, you can choose AMD. Please note that when purchasing processor, whether INTEL or AMD make sure with the vendor that the processor supports the motherboard which you are planning to purchase.

(3) RAM (RANDOM ACCESS MEMORY)
RAM is available in different types like SDRAM, DDR1, DDR2, DDR3. Some motherboards support only DDR1 and some DDR2 or DDR3. So make sure that the RAM you purchase supports the motherboard.

(4) CDROM /DVD-RW /COMBO DRIVE
Many brands are available such as LG, SAMSUNG, LITEON etc.

(5) HDD (HARD DISK DRIVE)
Many brands are available such as SEAGATE, SAMSUNG, WESTERN DIGITAL etc. There are two types of HDD available. They are IDE HDD and SATA HDD which can be fixed inside cabinet.

(6) ATX CABINET
Cabinet is a metal or metal coated box where you fix motherboard and all other peripherals related to computer.

(7) SMPS (SWITCH MODE POWER SUPPLY)
SMPS is the power supply where you connect the computer from main power supply using power chord.

(8) MONITOR
This is an output device available as two types. One is CRT and the other is LCD. CRT monitor is heavy when compared to LCD monitor.

Note: Always remember to check with vendor for compatibility and support of any hardware peripherals with motherboard you purchase.

Tuesday, June 21, 2011

Cannot open BIOS for changing the settings

If you want to install operating system through bootable operating system CD/DVD and you are not able to make any changes in BIOS like changing the first boot sequence to CD/DVD drive, then you have to first clear or reset the BIOS settings to factory default and make any changes you desire.

Procedure:
Switch of the computer. Open the CPU cabinet and look for the battery placed on the motherboard. 
 Remove the battery and switch on the computer. Now you should be able to see " CMOS ERROR " press F2 or F10 or DEL to enter BIOS. The error message varies depending on the manufacturers of the motherboard and BIOS. Switch off the computer now and put the battery back to motherboard and switch on the computer and press F2 or F10 or DEL to enter BIOS depending on your BIOS manufacturers. You should now be able to make any changes to BIOS. Remember, any changes made to the BIOS will not be saved if there is no battery placed on the motherboard.

Google Analytics