Many might have been tired of searching for very good online converter for converting Microsoft Word (DOC) to Portable Document Format (PDF) or vice versa. Many website offer online converting tool. But the problem is after converting one or the other problem exists such as text alignment, extra or no spaces spaces, image(s) not aligned properly and so on.
Click on the below link to open the website to convert "Doc to Pdf" or "Pdf to Doc". The conversion is free and fast and above all, you can see all the contents, alignment, images, etc are exactly placed as the original source file.
http://www.pdfonline.com/convert-pdf/
Friday, December 27, 2013


Thursday, December 26, 2013
Procedure to switch from Normal Start Menu to Classic Start Menu
Whenever you install Windows operating system for first time
or re-installing Windows operating system you will see the start menu as
default Normal Start Menu.


To change this to "Classic Start Menu".

Hold the WINDOWS Key and press R or go to START and click on RUN
to open RUN window . Type CONTROL in the
RUN window to open CONTROL PANEL.

Double click on "Taskbar and Start Menu" icon to open "Taskbar and
Start Menu Properties".

In the "Taskbar and Start Menu Properties" window, click on
Start Menu tab and select the "Classic Start Menu". Click on APPLY and OK to close the window.

Click on Start to see the "Classic Start Menu"
Sunday, December 22, 2013
How to delete temperory or junk files?
Temporary files are stored in your hard disk in many ways when
you are working on Windows. For Eg: When installing any new software(s) or
uninstalling existing software(s) some of the files are extracted into the “Temp”
folder of your Windows. These files are junk or obsolete files and is not used
by Windows or any of its applications or softwares. It has to be removed
frequently to increase disk space as well as to increase the performance of the
system.


Procedure to delete temporary files of the current user
profile:
(1) Go to “START” and click on “RUN” or hold the “WINDOWS” key and press “R” to open “RUN” window.
(2) In the “RUN” windows type “%temp%” to open temporary folder of the current user profile.
(1) Go to “START” and click on “RUN” or hold the “WINDOWS” key and press “R” to open “RUN” window.
(2) In the “RUN” windows type “%temp%” to open temporary folder of the current user profile.

(3)
Select all the files from "Temp" folder and delete.
(4) Please
note that in many cases all the files cannot be deleted because some files will
be still used by the Windows after installing new software(s) or uninstalling existing
software(s). In that case, restart the system and repeat the all the procedures
again.
Procedure to remove temporary files from “Temp” in Windows :
(1)
Right click on “START” and click on “EXPLORE” or
hold the “WINDOWS” key and press “E” to open “WINDOWS EXPLORER”
(2)
In the left column click on “WINDOWS” under “Local Disk (C:)” and double click on “Temp”
folder on the right window to open temporary files.


(3)
Select all the files from "Temp" folder and delete.
(4)
Please note that in many cases all the files
cannot be deleted because some files will be still used by the Windows after
installing new software(s) or uninstalling existing software(s). In that case,
restart the system and repeat the all the procedures again.
Thursday, May 03, 2012
Installing device driver for computer hardware devices
In the previous post, I had discussed about viewing installed or not installed devices. This post tells you how to install device driver for computer hardware devices.
PROCEDURE:
If you have installed WINDOWS operating system freshly, some on-board motherboard hardware devices such as display, audio, enternet, etc or if you have installed any additional hardware devices other than on-board hardware devices such as display, audio, enternet, etc need to be detected using drivers manually. All motherboard manufacturers provide drivers CD/DVD along with the motherboard when purchased.
If the drivers CD provided is AUTOPLAY (when CD/DVD is inserted into the CD/DVD drive the drivers application software runs automatically showing the list of motherboard drivers to be installed) select the devices from the list whose drivers needs to be installed and click on install or follow the instructions provided in the drivers application software till you finish the installation. Once finished installation restart the computer if needed to make the drivers detect the hardware devices.
If the CD/DVD provided is not AUTOPLAY, then follow the procedure as shown below.
Go to "START" and click on "SETTINGS" and click on "CONTROL PANEL" to open CONTROL PANEL window. Inside CONTROL PANEL window double click on "SYSTEM" to open "SYSTEM PROPERTIES" window. In the "SYSTEM PROPERTIES" window click on "HARDWARE" tab. Now you should be able to see a "DEVICE MANAGER" or hold the "WINDOWS KEY" and press "R" to open RUN window or go to "START" and click on "RUN" to open RUN window. Now type "devmgmt.msc" in the RUN window and click OK button or press "ENTER" key to open DEVICE MANAGER window.
In the DEVICE MANGER list look for "OTHER DEVICES". The drivers for the hardware devices list shown under "OTHER DEVICES" are not installed.
 Now insert the drivers CD/DVD provided by the motherboard manufacturer into the CD/DVD drive. Now double click on the first device under the "OTHER DEVICES" list. A new window opens up showing the properties of that particular device. Now click on "RE-INSTALL DRIVER" button to open "HARDWARE UPDATE WIZARD" window.
 Now select "No. not this time" and click "NEXT" to go to next step.

In the next step select "INSTALL FROM A LIST OR SPECIFIC LOCATION (ADVANCED)" and click on "NEXT" to go to next step.

Here select only "SEARCH REMOVABLE MEDIA (FLOPPY, CD_ROM...)" and click "NEXT" to begin installation of driver from the CD/DVD.

It automatically detects the drivers for the particular hardware device. Finally click "FINISH" to complete the device driver installation. Follow the same procedure for installing device driver for all the devices that are not installed and that are shown in the list under "OTHER DEVICES" list.
NOTE:
WINDOWS XP operating system service pack2 or WINDOWS XP operating system service pack3 comes with most motherboard hardware components drivers integrated. It all depends on the type and the manufacturer of the motherboard. As a result, some motherboards drivers need not be installed manually as the device drivers would have been installed when installing operating system. If some motherboard hardware drivers not installed during installation of WINDOWS operating system, then you need to install drivers manually for those hardware components.
PROCEDURE:
If you have installed WINDOWS operating system freshly, some on-board motherboard hardware devices such as display, audio, enternet, etc or if you have installed any additional hardware devices other than on-board hardware devices such as display, audio, enternet, etc need to be detected using drivers manually. All motherboard manufacturers provide drivers CD/DVD along with the motherboard when purchased.
If the drivers CD provided is AUTOPLAY (when CD/DVD is inserted into the CD/DVD drive the drivers application software runs automatically showing the list of motherboard drivers to be installed) select the devices from the list whose drivers needs to be installed and click on install or follow the instructions provided in the drivers application software till you finish the installation. Once finished installation restart the computer if needed to make the drivers detect the hardware devices.
If the CD/DVD provided is not AUTOPLAY, then follow the procedure as shown below.
Go to "START" and click on "SETTINGS" and click on "CONTROL PANEL" to open CONTROL PANEL window. Inside CONTROL PANEL window double click on "SYSTEM" to open "SYSTEM PROPERTIES" window. In the "SYSTEM PROPERTIES" window click on "HARDWARE" tab. Now you should be able to see a "DEVICE MANAGER" or hold the "WINDOWS KEY" and press "R" to open RUN window or go to "START" and click on "RUN" to open RUN window. Now type "devmgmt.msc" in the RUN window and click OK button or press "ENTER" key to open DEVICE MANAGER window.
In the DEVICE MANGER list look for "OTHER DEVICES". The drivers for the hardware devices list shown under "OTHER DEVICES" are not installed.


In the next step select "INSTALL FROM A LIST OR SPECIFIC LOCATION (ADVANCED)" and click on "NEXT" to go to next step.

Here select only "SEARCH REMOVABLE MEDIA (FLOPPY, CD_ROM...)" and click "NEXT" to begin installation of driver from the CD/DVD.

It automatically detects the drivers for the particular hardware device. Finally click "FINISH" to complete the device driver installation. Follow the same procedure for installing device driver for all the devices that are not installed and that are shown in the list under "OTHER DEVICES" list.
NOTE:
WINDOWS XP operating system service pack2 or WINDOWS XP operating system service pack3 comes with most motherboard hardware components drivers integrated. It all depends on the type and the manufacturer of the motherboard. As a result, some motherboards drivers need not be installed manually as the device drivers would have been installed when installing operating system. If some motherboard hardware drivers not installed during installation of WINDOWS operating system, then you need to install drivers manually for those hardware components.
Tuesday, May 01, 2012
How to know devices that are not properly installed in WINDOWS
In a computer any devices (example: DVD Writer, Display, Network card or Ethernet card or any external devices attached, etc) to work properly you need to install driver for that particular device. If you are facing problem with any devices not working properly or not getting detected properly, then you might have not installed the device driver properly or if already installed then the device driver might have been corrupted or the device hardware itself should be having a problem. All the computer hardware components or devices installed successfully or unsuccessfully can be viewed in DEVICE MANAGER.
To open DEVICE MANAGER, go to "START" and click on "SETTINGS" and click on "CONTROL PANEL" to open CONTROL PANEL window. Inside CONTROL PANEL window double click on "SYSTEM" to open "SYSTEM PROPERTIES" window. In the "SYSTEM PROPERTIES" window click on "HARDWARE" tab. Now you should be able to see a "DEVICE MANAGER" button.
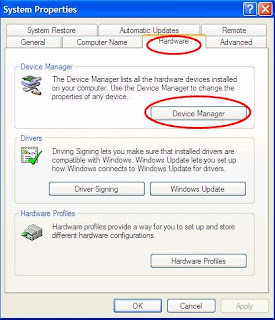 Click on "DEVICE MANAGER" to open "DEVICE MANAGER" window to see the list of all installed devices in your computer.
 The easiest way to open DEVICE MANAGER using keyboard is hold the "WINDOWS KEY" and press "R" to open RUN window or go to "START" and click on "RUN" to open RUN window. Now type "devmgmt.msc" in the RUN window and click OK button or press "ENTER" key to open DEVICE MANAGER window.
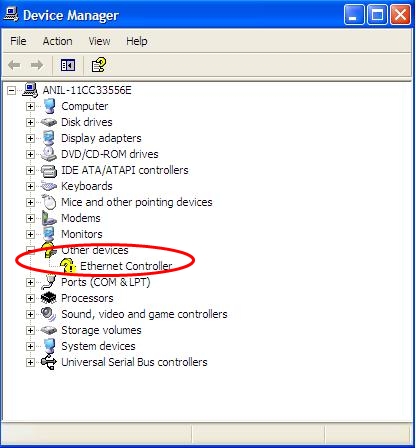
In the device list if any device which has a yellow question mark with exclamatory symbol on the left side of the device name as shown below, means that particular device is not installed. In order to make that particular device work properly, you should install driver for that device. In the below image you can see that there is a yellow question mark with exclamatory symbol next to "EHTERNET CONTROLLER". This means the network or ethernet driver is not installed. In order to make the ETHERNET CONTROL work, you need to install the ethernet or network driver.
 Sometimes some devices will not work even if the driver is installed properly. For example, consider sound driver is installed properly and you are not be able to hear the sound. Then first check whether the volume control in the STATUS bar is MUTE. If it is not mute then re-installing the device driver for sound card. If you still cannot hear the sound, then chances are more that your sound card hardware device is not functioning properly.
To open DEVICE MANAGER, go to "START" and click on "SETTINGS" and click on "CONTROL PANEL" to open CONTROL PANEL window. Inside CONTROL PANEL window double click on "SYSTEM" to open "SYSTEM PROPERTIES" window. In the "SYSTEM PROPERTIES" window click on "HARDWARE" tab. Now you should be able to see a "DEVICE MANAGER" button.


In the device list if any device which has a yellow question mark with exclamatory symbol on the left side of the device name as shown below, means that particular device is not installed. In order to make that particular device work properly, you should install driver for that device. In the below image you can see that there is a yellow question mark with exclamatory symbol next to "EHTERNET CONTROLLER". This means the network or ethernet driver is not installed. In order to make the ETHERNET CONTROL work, you need to install the ethernet or network driver.
Subscribe to:
Posts (Atom)